Search by Keyword
Importing (Video + Data) via Hudl / Sideline Video Companies
Importing video from Hudl or your sideline replay system with the data that you’ve tagged to the clips is very easy with our new import functionality. Make sure your clips to be exported from the various systems in MULTIPLE CLIPS. Here is a link to a tutorial on How to export via Multiple Clips on Hudl.
Once you have the videos, you will need to download the data file from Hudl and combine the video folder with the CSV/Excel sheet into one .zip file to import. Let’s walk through the steps below.
How to combine the video and data files into a .zip file for upload into Just Play
- Request for download from Hudl will give you a .zip file with all your video clips. You should also have your CSV/Excel data file downloaded separately as well.
- Unzip the file with the videos by double clicking on it. This will create a regular folder that contains your video.
- Drag the CSV/Excel file into the video folder.
- Right-click on the video folder to “compress” or “zip” it.
This new .zip file contains both the video and data file and is now ready for import into Just Play. Take a look at the following screenshots to ensure you’ve completed this process correctly.

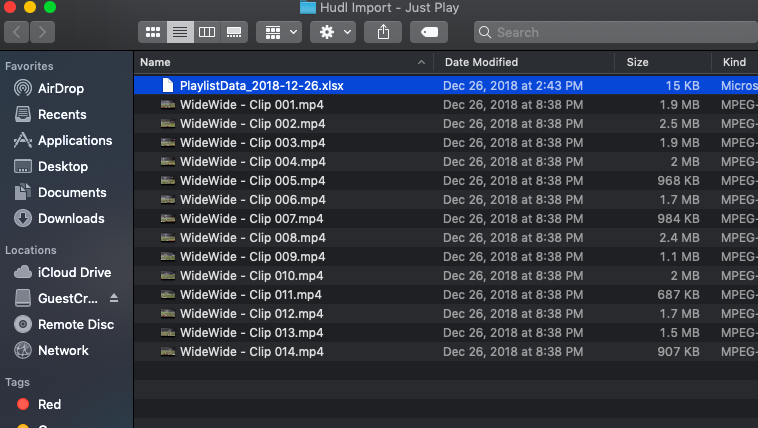
Below is what your folder should look like with the (a list video clips + a single data file) before import. This is the folder you will “compress” or “zip”.

Apply a custom name to each clip
IMPORTANT: When uploading using this method, you have the ability to custom name your clips. This will allow you to avoid generic naming (ex: WideWide01.mp4) in Just Play and will make your clips easier to search.

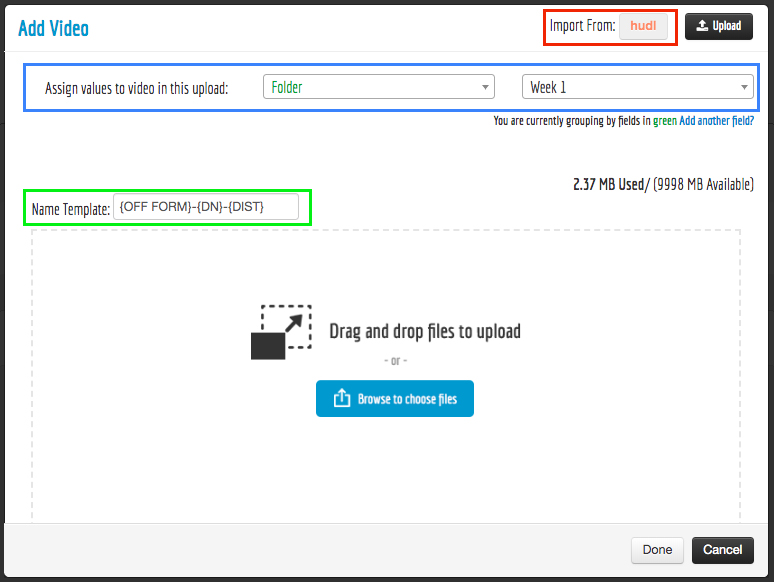
In the Just Play Video Library, after you have selected the Hudl Import button (shown in red below), you will see a field called Name Template (shown in green below). Add the fields from your data file inside of brackets to name set a custom name for each clip.
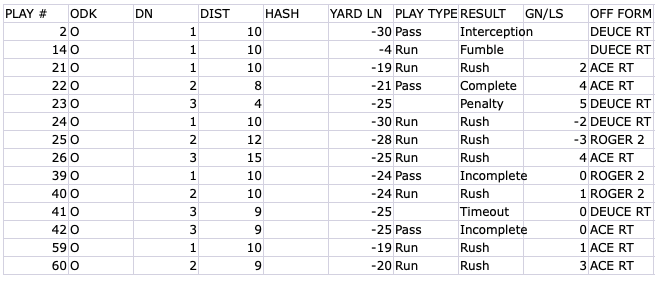
For example, using the naming template {OFF FORM}-{DN}-{DIST} will name the clips from the data file above as follows:
- DEUCERT-1-10.mp4
- ACERT-2-8.mp4
- ROGER2-1-10.mp4
- etc.
Note: Brackets are required to find the correct column and the value inside the bracket must match the column headings in the data sheet (case-sensitive).

Assigning custom values to clips
It is also possible to assign custom values to every clip on import. For example, if you organize your video by “folder” or by “game”, make sure to add these values at the time of your import. You can do this by using the “Assign values to video in this upload field” (shown in blue above).
In the example screenshot, all video clips imported will be assigned a value of “Week 1” in the “folder” field. This means you can group your video library by “folder” to keep your video library organized and easy to browse and search.
