Search by Keyword
Creating a Presentation
Presentations allow coaches to create custom sets of information containing plays, terminology, video, diagrams, and quizzes. Coaches can use this feature as a presentation tool and assign them to a group of users for study in the player app.
Creating a New Presentation
1. Create a New Presentation – From the Presentation Menu, select “+ New” from the right hand side of the page
2. Add detail and organization to your Presentation – From the “Add A Presentation” window, you can:
- Name your presentation
- Assign a type (Gameplan or Install for example)
- Schedule the date assigned to the presentation
- Assign a Date Range (time when the presentation will be available and assigned individuals will have access)
- Assign the presentation to individuals or groups
Adding Items to a Presentation
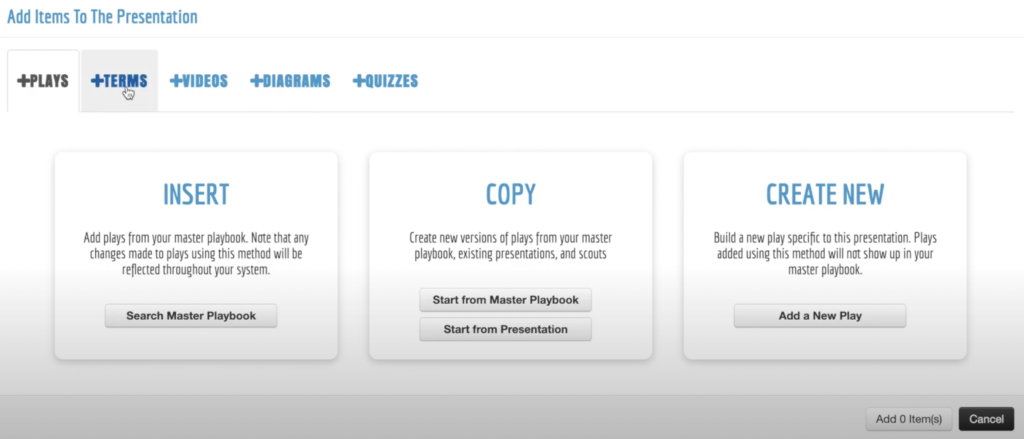
There are 4 ways you can add plays (along with terms, videos, diagrams and quizzes) to a Presentation:
1. INSERT Plays from Master Playbook
Provides the user the ability to pull plays from the Master Playbook to create a presentation.
Changes: Will be reflected in the master playbook.
Note: Terminology that is added will always be added as a Master item. Therefore, like plays, changes will be reflected in both the GamePlan/Install and the Term.
2. COPY New Versions from Master Playbook:
This creates a copy of the play contents (diagrams, video, assignments) to then adjust within the Presentation.
Changes: Will not be reflected in the master playbook.
3. COPY Plays from Existing Presentation:
This allows users to search through prior presentations to create a copy of the play contents (diagrams, video, assignments). Changes: Will not be reflected in the prior presentation.
4. CREATE NEW Plays Specific to this Presentation:
This allows users to create play contents (diagrams, video, assignments) that are only available in this presentation. Changes: Do not impact anywhere else in the system.
After you’ve selected what type you wish to use, take advantage of filters to make selecting plays easier.
Sharing Your Presentation
The final step in creating your presentation is to make it active and share it with the appropriate group.
